Tomasz Kisiel
Backend Developer
2023-10-25
#Development
Time to read
15 mins
In this article
Introduction
Say hello to Watson
Build conversation flow
Is your order correct?
But wait! Is our pizza for free?!
Let's forward this
Conversation preview
Summary
Share this article
Introduction
In the last year artificial inteligent solutions gaining a lot of interest equal from all size businesses as well as from end users. It's not wonder that people are looking for ways to incorporate AI into their processes. However, building your own AI from scratch is a time-consuming road that leads through many difficulties and is not easy to go through with limited resources. This is where ready-to-use solutions such as IBM Watson Assistant come in handy.
Watson Assistant is a part of the artificial intelligence platform developed by IBM that enables users to build, test, and deploy their own chatbot assistants for various purposes with a code-less approach. Its natural language understanding, intent recognition, context variables, and custom extensions allow you to quickly create custom virtual assistants for your business needs.
In this blog post I will guide you step-by-step through the process of developing simple assistant that allows users to place an order for their favorite pizza at an online pizzeria. We will prepare list of available products, build flow of conversation and forward the summary of order to external service. So without further ado - let's get started...
Say hello to Watson
Before moving on, make sure you have successfully signed up to IBM Cloud Dashboard and turned on Watson Assistant service. Once you've completed this, we may proceed to creating new chatbot in Watson Assistant's managing panel.
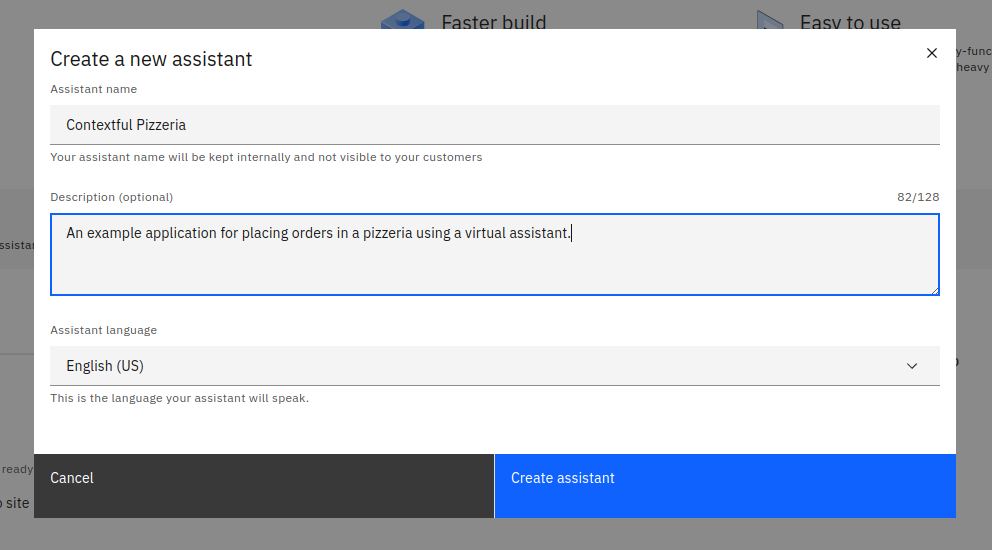
After you've provided assistant details you may continue by clicking "Create assistant" button. Voilà! New assistant is already created and as you might notice the main dashboard of its is full of useful hints and suggestions that may help with further work, but today we skip them and we go our way.
Before we begin implementing our conversation flow we have to prepare a few things that we will later use in it. First thing first we need to tell Watson what product out pizzeria offers. For this we will have three types of entities - "pizzas", "drinks" and "toppings" which each of them will share same data structure interface.
By looking on the left sidebar you could see "Actions" tab which lead you to actions panel. Here we start by creating new variable in subsection called "Created by you".
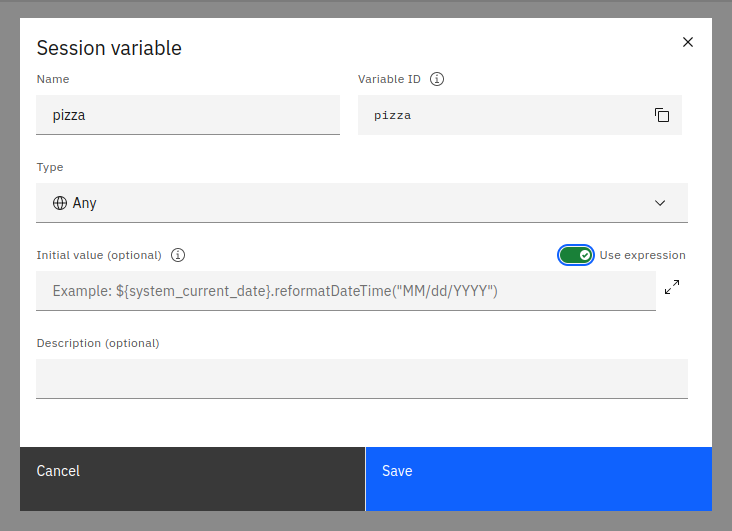
In above screen we may specify variable name and type as "Any" as we would like have here array of objects stored in JSON format. In order to do this we have to enable expression feature under toggle button in the right side. This allows use to use ful power of Watson expressions language. In our case we just put here array like the one below which contains information about pizza's name and price.
After applying and saving this variable, in very similar manner we have add two another - "drink" and "topping". Here you may find JSON which I used for each variable.
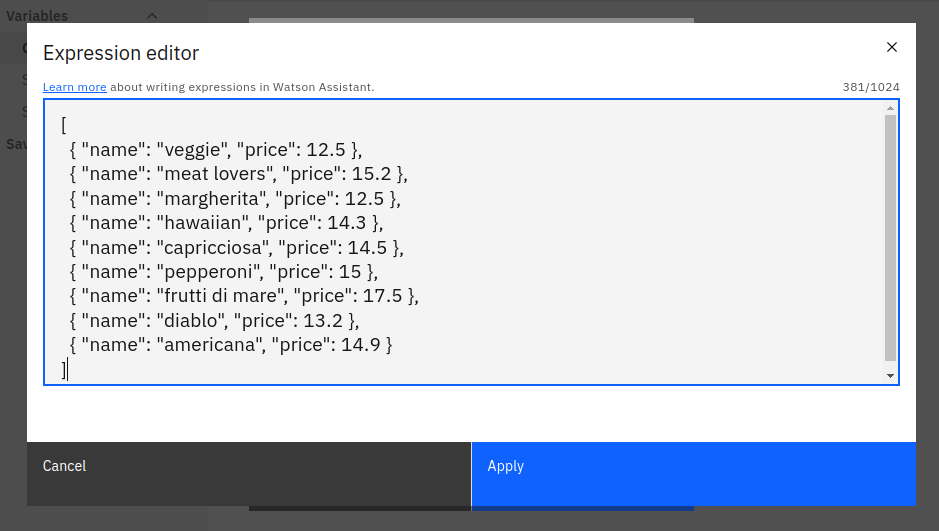
Pizzas:
1 2 3 4 5 6 7 8 9 10 11[ { "name": "veggie", "price": 12.5 }, { "name": "meat lovers", "price": 15.2 }, { "name": "margherita", "price": 12.5 }, { "name": "hawaiian", "price": 14.3 }, { "name": "capricciosa", "price": 14.5 }, { "name": "pepperoni", "price": 15 }, { "name": "frutti di mare", "price": 17.5 }, { "name": "diablo", "price": 13.2 }, { "name": "americana", "price": 14.9 } ]
Drinks:
1 2 3 4 5 6 7 8[ { "name": "coca-cola", "price": 3.2 }, { "name": "fanta", "price": 2.7 }, { "name": "sprite", "price": 3 }, { "name": "orange juice", "price": 2.3 }, { "name": "apple juice", "price": 2.3 }, { "name": "carrot juice", "price": 2.5 } ]
Toppings:
1 2 3 4 5 6 7 8[ { "name": "onion", "price": 1 }, { "name": "extra cheese", "price": 1.2 }, { "name": "ketchup", "price": 0.5 }, { "name": "garlic sauce", "price": 0.5 }, { "name": "carrot chips", "price": 1 }, { "name": "thick crust", "price": 0.8 } ]
Build conversation flow
Once we have following setup completed we can go back to actions section and starts by creating new action. Actions are specific tasks that the chatbot may performed based on user's input or certain conditions configured by developer what we see later in use.
After you click "Create action" button you'll be asked what user say to assistant to start this action. We will start simply with "I would like to order a pizza.".
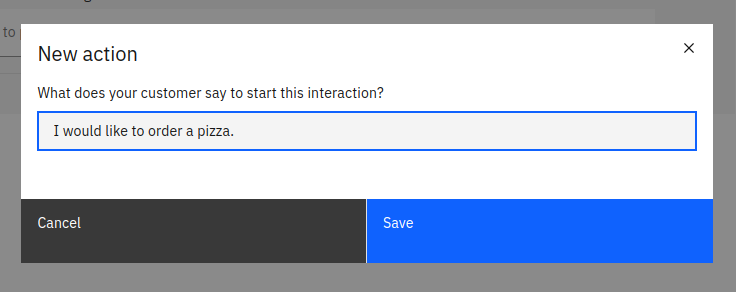
Now that you've completed this form, you can proceed and add another sentences that statistical user may say when ordering a pizza. We will add four another examples here. Providing more high-quality examples here will generally make it easier for Watson to identify the user's intention.
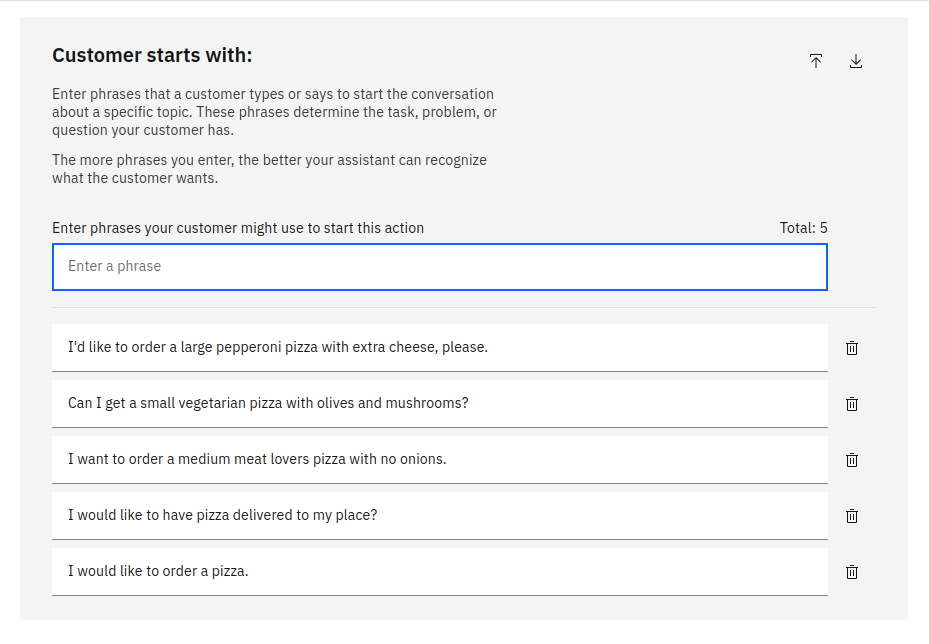
Here are few example sentences that user may say when wants to order a pizza":
- I'd like to order a large pepperoni pizza with extra cheese, please.
- Can I get a small vegetarian pizza with olives and mushrooms?
- I want to order a medium meat lovers pizza with no onions.
- I would like to have pizza delivered to my place?
What pizza would you like?
When user's intention can be correctly recognized by Watson we may start building steps that allows as to collect following information:
- What pizza does the user want to order?
- What size of pizza does user want?
- What toppings on pizza does user want?
- What drink does user want?
- And finally - what is the address of delivery?
The "Conversation steps" section lists the steps the assistant must take during this action. At the top you can see condition which is now set to "without condition", this indicates Watson that this step should be performed without any condition.
Not much further down is the "Assistant says" section, which allows us to specify the question the assistant will ask the user. Here we want to ask what kind of pizza the user prefers.
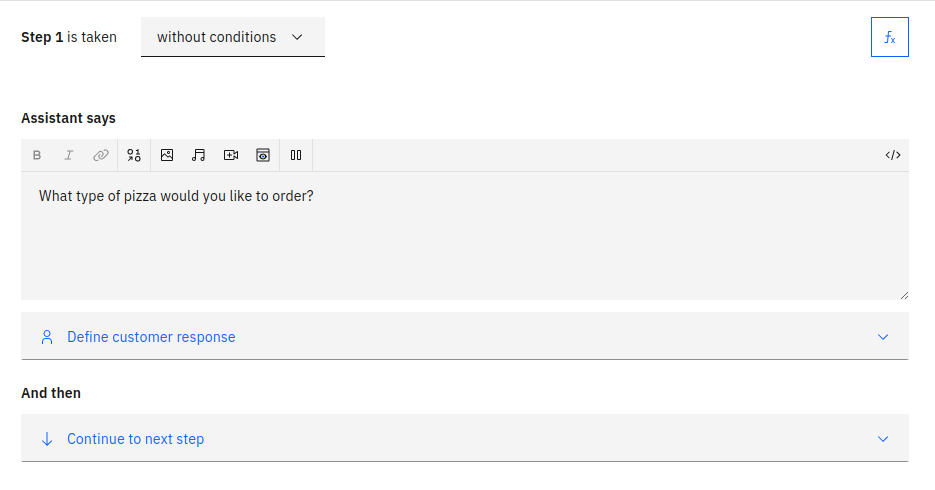
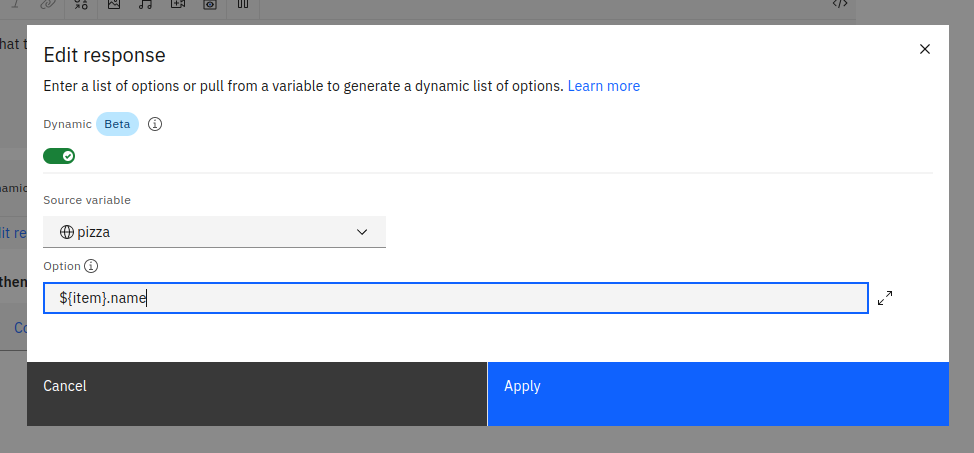
To finish this step, we need to specify the response that the user can provide. In the "Define customer response" section, you may notice a few types of responses that Watson is able to understand. For our purposes, we will select the "Options" type, which enables us to specify a list of options that the assistant can recognize. We want to utilize the "pizza" variable here, so we need to toggle the "Dynamic" switch and select the source variable.
Since our variable is not simply a string but an object, we also need to specify which part of it is important in this context. Once again, we have to use expression language to extract the pizza name as an allowed option.
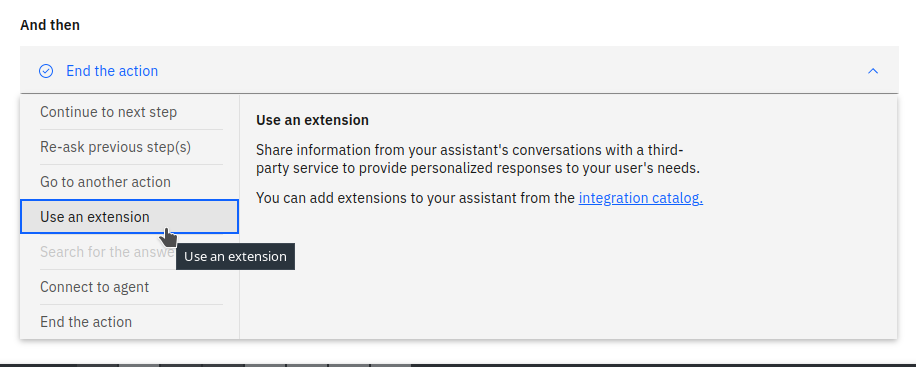
At the end of this section, we can also see the "And then" section, which is currently set to "Continue to next step," which is suitable for our needs. By experimenting with this option, you may discover other possibilities of Watson such as calling an external agent or utilizing an extension. In a later paragraph, we will focus on how to build and apply our own extension here.
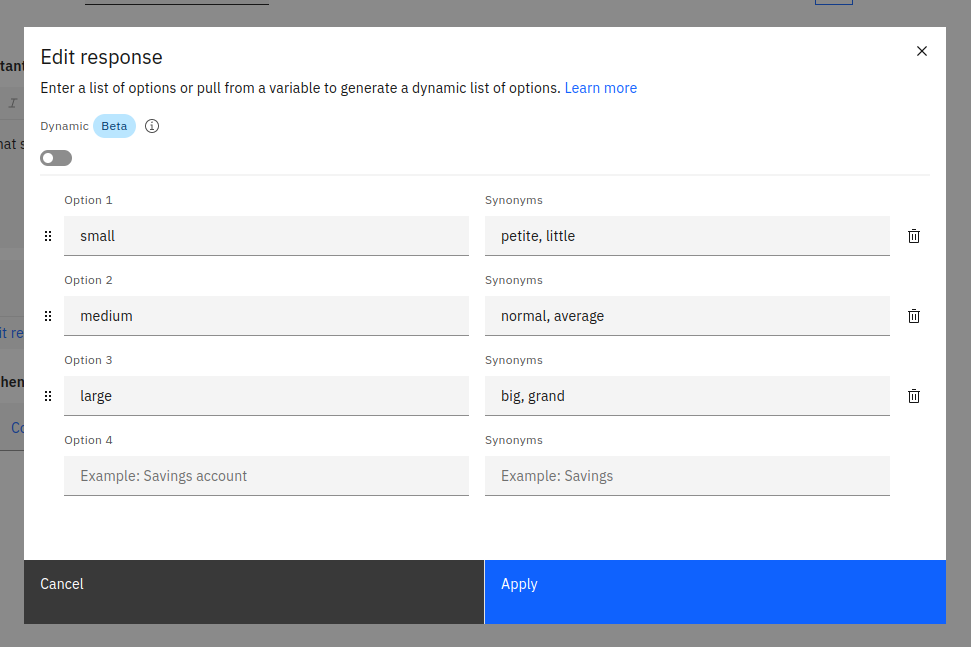
In the same way, we can add three more steps by setting questions about size, toppings and drink in them. One problem you may notice here is that we haven't prepared any variable for pizza sizes. This is not really an issue because when we do not switch the "Dynamic" toggle, we can define fixed answers recognized by the assistant. For each of the options, we can also define synonyms that will allow Watson to understand a wider range of words that user may use to describe what he wants.
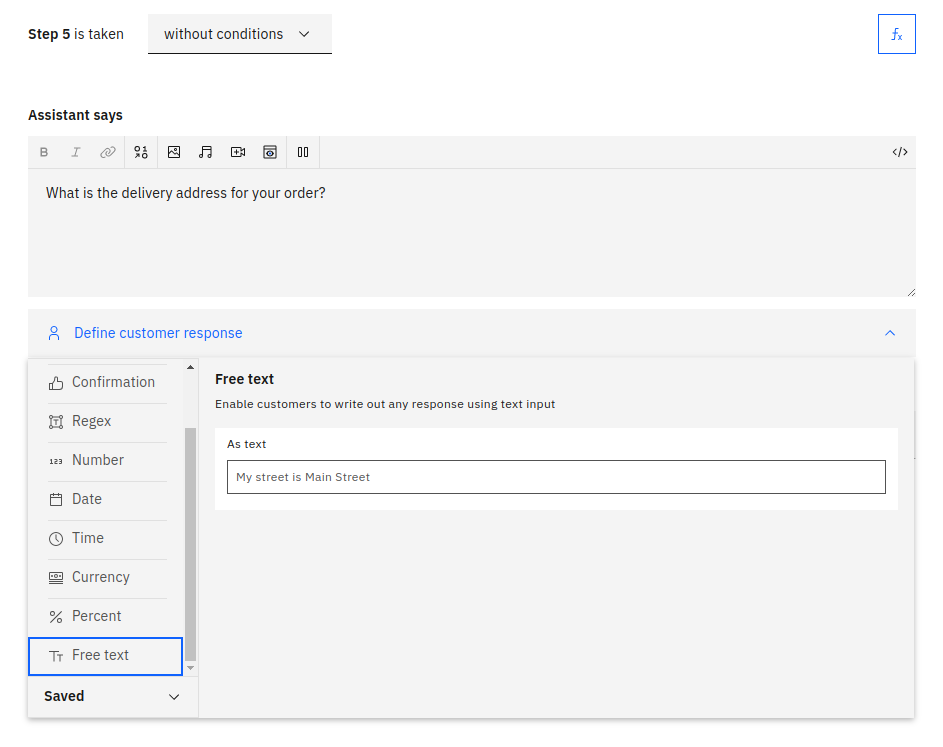
Another thing we would like to ask the user is their delivery address. To do this, we will use another response type called "Free text." This allows the user to enter any text that is not precisely defined by us, which is good as we rather prefer not to specify each possible address of our city or region.
Before proceeding to the order summary, there is one more thing we want to improve. Just as a new user of our pizzeria will likely follow each step of our process in sequence, an experienced user who is familiar with our products may place an order with just one sentence, such as "I would like to order a small veggie pizza with extra cheese and a cola.". Would we trouble them with additional questions when we already have all the necessary information? Certainly not!
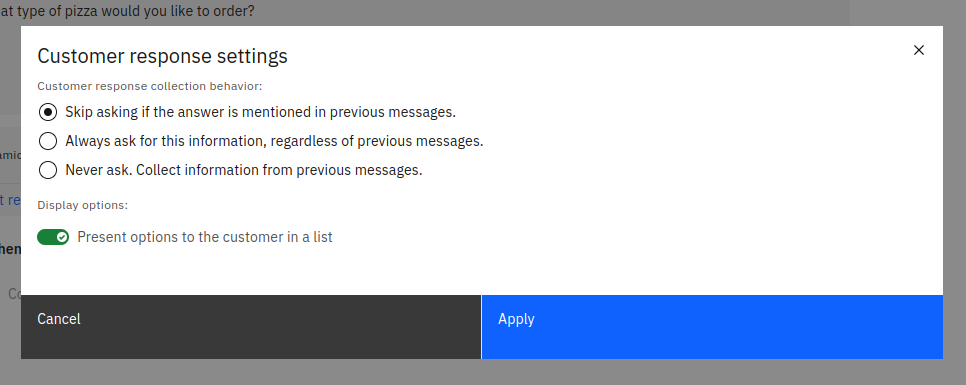
In this case, for questions where we defined an "Options" type response, we need to go to the settings, represented by the gear icon, and enable the option "Skip asking if the answer is mentioned in previous messages.". This allows Watson to skip this step if the information was already provided.
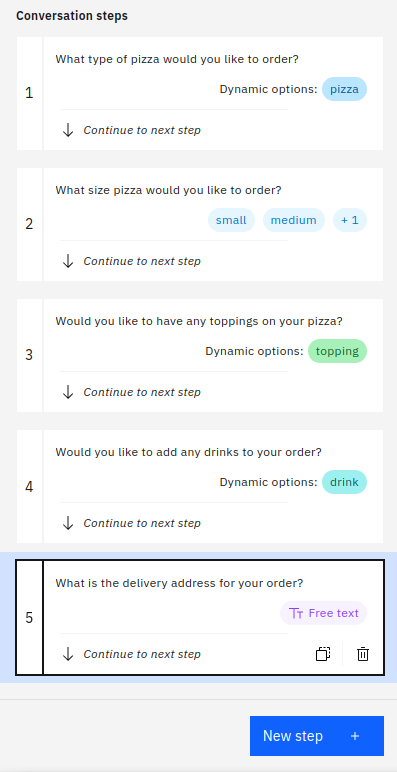
After following all the previous instructions, the conversation should consist of five steps and look like the one below. In the next section, we will examine the order summary, discuss the use of previously collected information in Watson's message, and utilize the conditional step feature.
Is your order correct?
When working with intelligent assistants, one of the most important things is to always summarize the outcome of the conversation and ask the user to confirm that everything is correct before proceeding with their request. Now we will focus on the summary of the order placed by the user and let him decide whether it matches what he expects. If, however, the user decides that this is not what he wants, we will let him go through the individual steps of the conversation again.
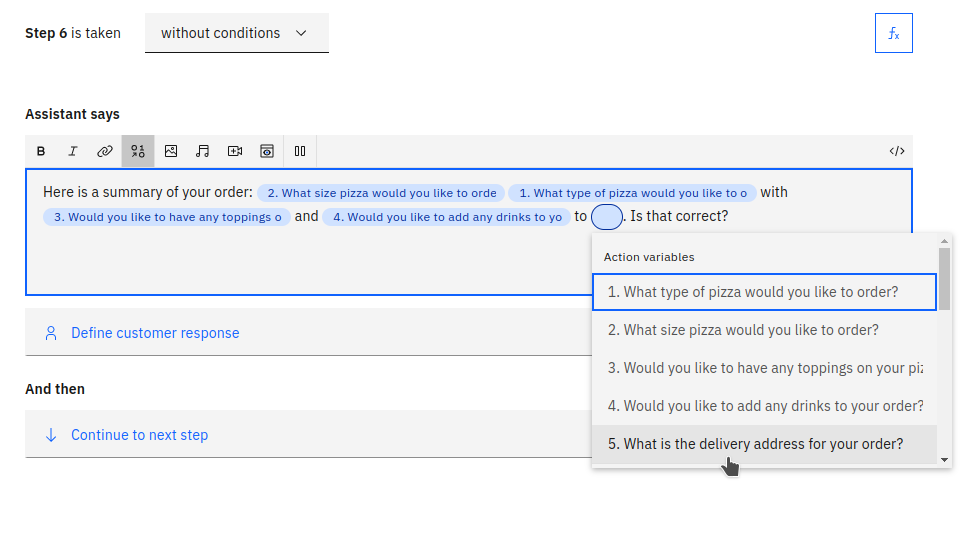
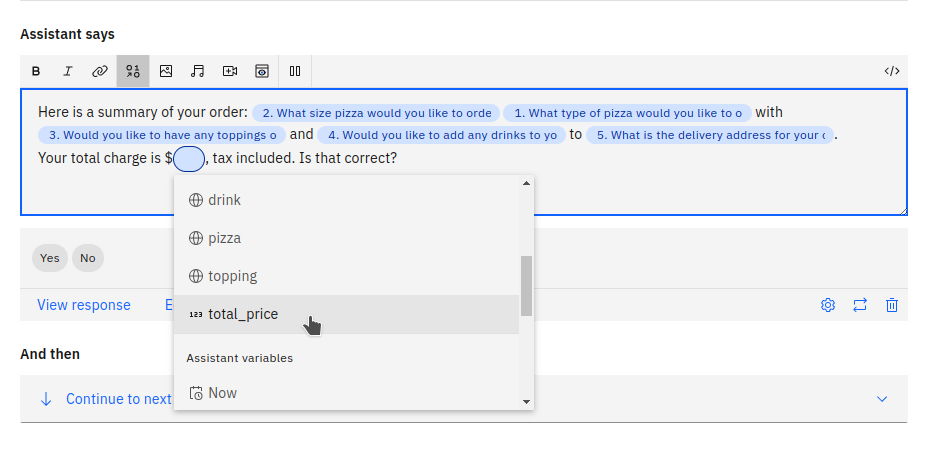
To achieve this, we will add three new steps. In the first one, we will present an order summary, which should look like "Here is a summary of your order: {size} {pizza} with {topping} and {drink}. Is that correct?". Of course, instead of placeholders, we would like products selected by the user to appear there. We can do this using the "Insert a variable" option available at the top of the text field, and then choose from which step we want to get the variable.
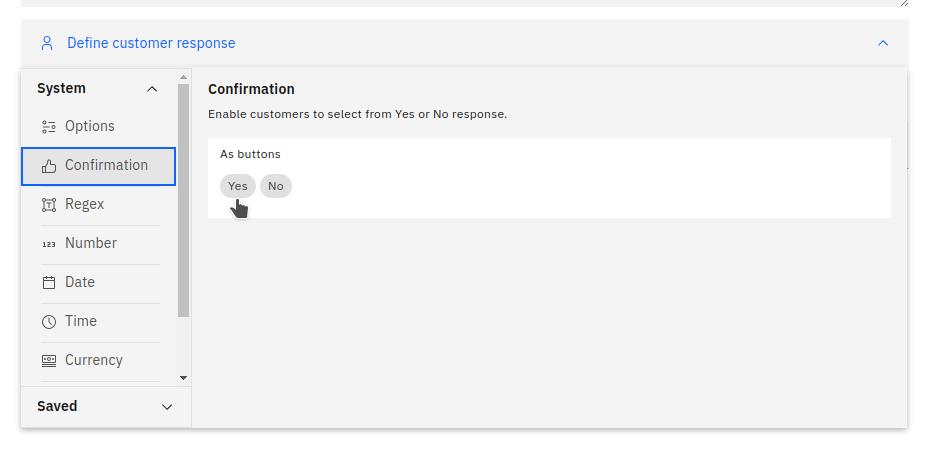
For this question, we will use a one another type of answer known as a "Confirmation" as the possible response. This allows the user to confirm or deny the question that was asked.
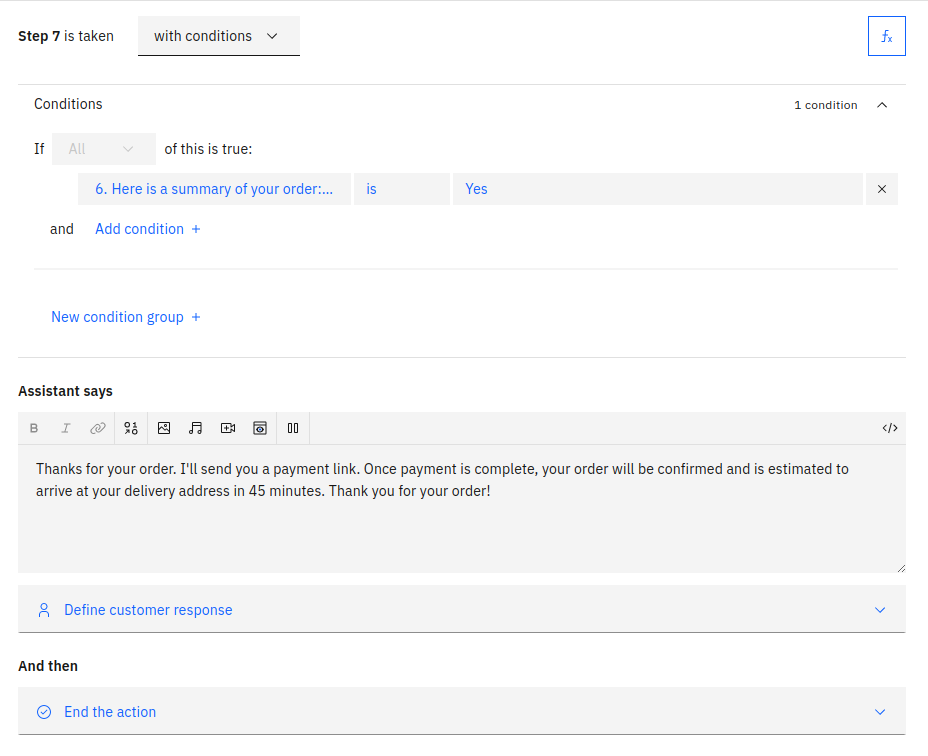
Upon answering the previous question, the flow of our conversation diverges into two branches. The first branch, the success branch, occurs when the user confirms that the presented order is correct. The second branch occurs when it is determined that the order is incorrect.
This time, we will create an optional step that will only be carried out if the user confirms the order. To accomplish this, we will set a condition stating that the step is to be performed only if the answer to the previous question was affirmative. In this step, we will inform the user that their order is currently being processed and complete the current action.
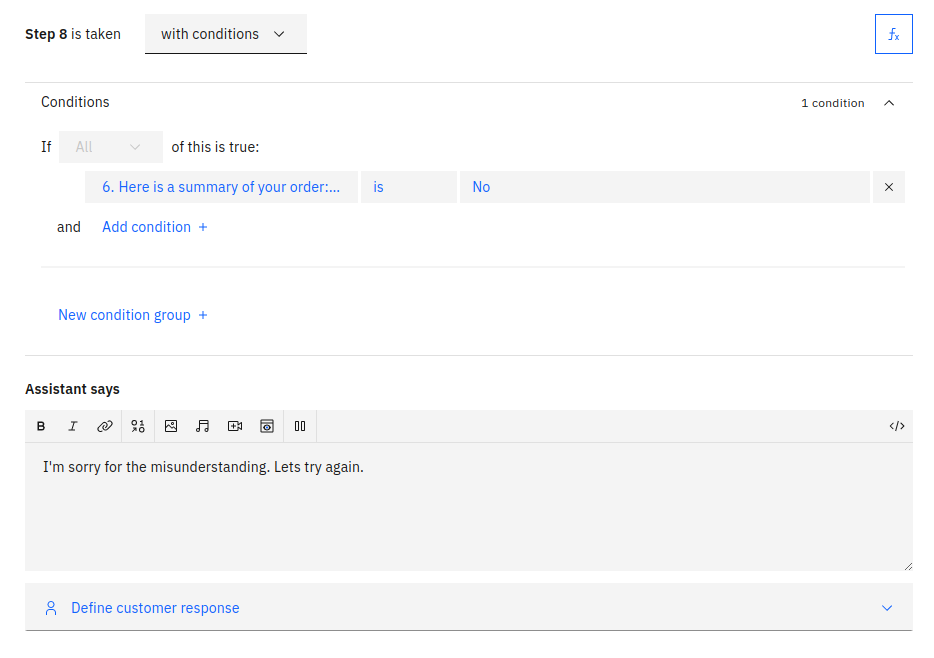
Otherwise, in the next step, which we will insert before the success step, we will provide information with an apology regarding the misunderstanding and allow the user to make their choice again. At the beginning of this step, we will set a condition to only execute if the user has not previously confirmed the summary.
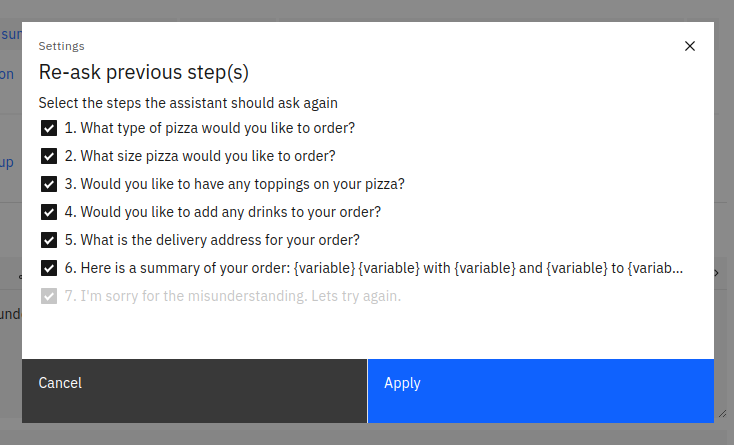
To allow the user to retake the conversation, in the "And then" field, select "Re-ask previous step(s)" and mark which questions should be repeated. In our case, these will be all questions from the start.
But wait! Is our pizza for free?!
So far, we have successfully constructed a conversation flow, but we have overlooked one crucial aspect. We don't want to give away our pizza for free, do we? Before we conclude the conversation with the user, we should also summarize and present the total cost of their order to them.
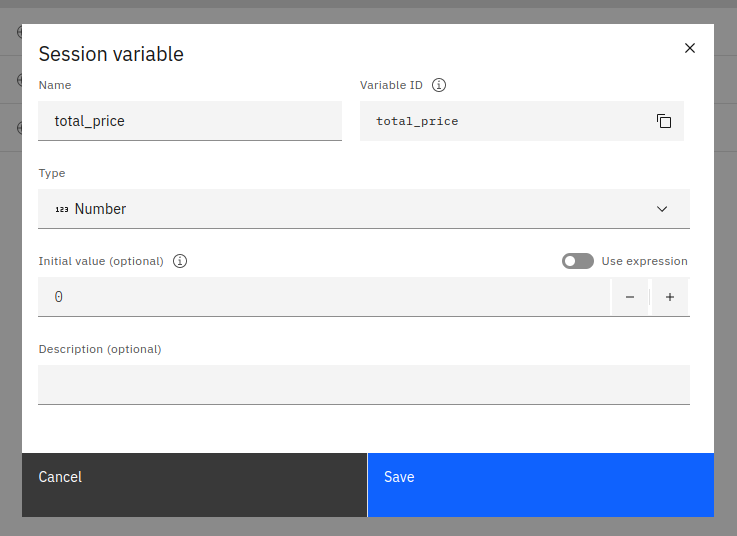
To achieve this, we will add a new numeric type variable and set its initial value to zero. In this variable, we will sum the prices of individual products and use it to present the total price to the user.
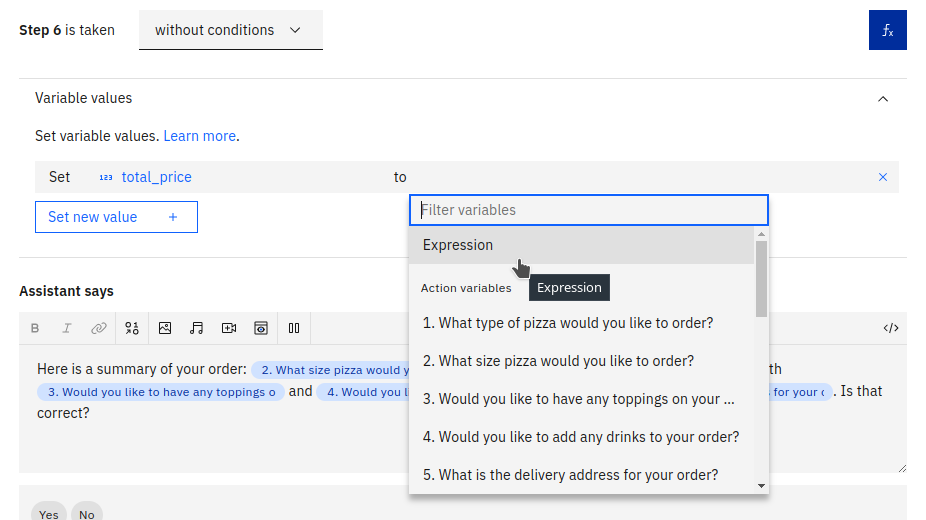
To calculate the total value of the ordered products, in the order summary step, select the "Set variable values" option in the right corner. Here, we can set a variable from a specific step or choose "Expression" to calculate more complex values.
In our case, we need to use an expression that will allow us to retrieve the value of the products from each step. To do this, we select the step in which we were asked about a specific product and after the dot, we add the phrase "item.price". The "item" property refers to the object that we used to create the option in the question, and "price" is the property that we set when we created the product list at the beginning of this tutorial. This expression will retrieve the price of the selected product and allow us to sum the values of all the products to get the total cost of the order.

At the very end of this section, we can display the calculated price in the summary. To accomplish this, we will once again utilize the "Insert a variable" option and, along with the rest of the summary, we will present the price. However, this time, instead of using an action variable, we will use a session variable.
Let's forward this
At the conclusion of our conversation, we would like to forward our client's order to our backend service, which will handle the rest of the details such as processing the payment and initiating the execution of the order. We can achieve this using the integration feature of IBM Watson Assistant.
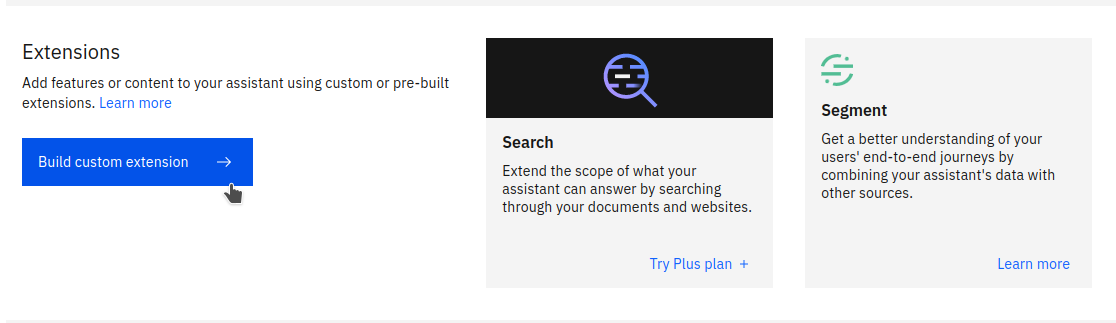
Integrations are tools that allow you to connect a virtual assistant with external services such as Messenger, Slack, or Twilio. Integrations also enable you to build custom extensions that allow you to consume the API of your own services. By integrating the assistant with external services and building custom extensions, we can expand the capabilities of our chatbot or voice assistant and provide a more seamless and comprehensive experience for the user.
To create a custom extension, return to the main dashboard of the assistant, navigate to the "Integrations" tab, and then press the "Build custom extension" button.
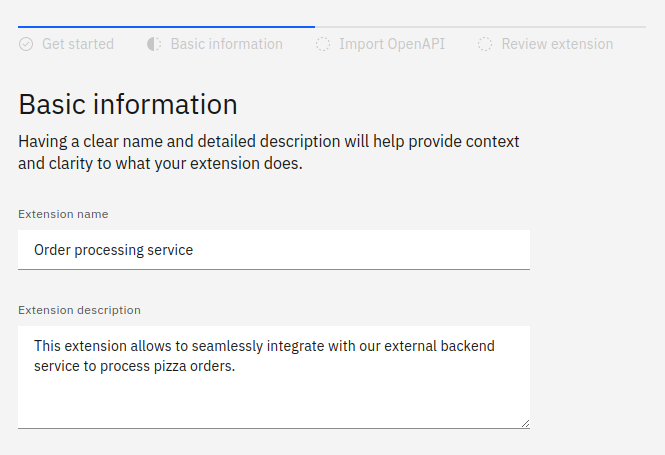
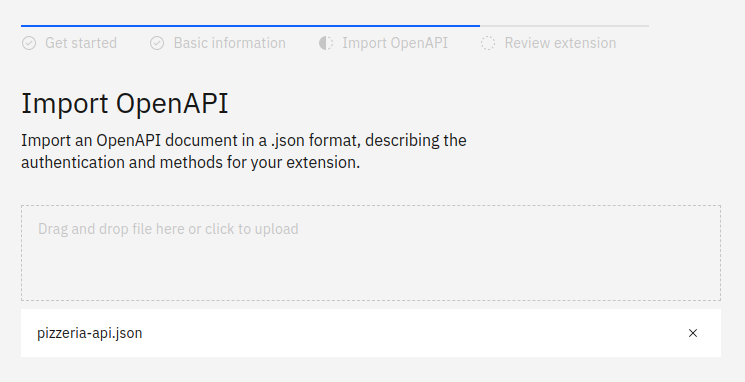
In the form that opens, we need to provide the name and optional description of the custom extension we are creating and import the OpenAPI specification of the service we want to consume. The OpenAPI specification is a standard way to describe APIs, and it provides information about the endpoints, operations, parameters, and responses of the API, which will be used by Watson Assistant to interact with the service.
For our example, we will use the example specification below, which declares a single endpoint for placing an order. Its arguments include the type and size of pizza, toppings, drink, and address, which we will gather from the user during the conversation. These arguments will be used to construct the request payload that will be sent to the backend service when the order is placed.
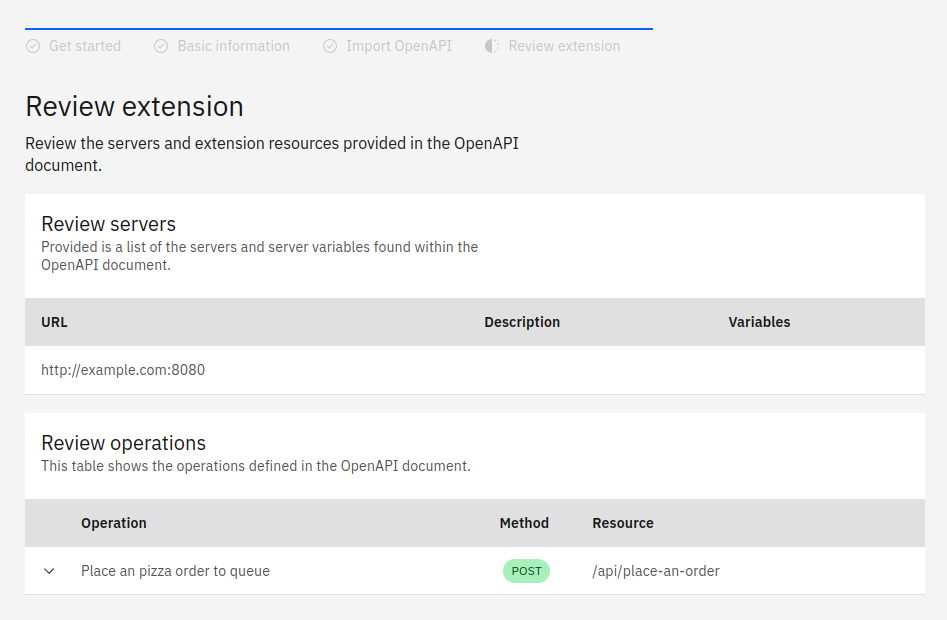
1 2 3 4 5 6 7 8 9 10 11 12 13 14 15 16 17 18 19 20 21 22 23 24 25 26 27 28 29 30 31 32 33 34 35 36 37 38 39 40 41 42 43 44 45 46 47 48 49{ "openapi": "3.0.0", "info": {"title": "Pizzeria API", "version": "1.0"}, "servers": [{"url": "http://example.com:8080"}], "paths": { "/api/place-an-order": { "post": { "summary": "Place an pizza order to queue", "operationId": "place-an-order", "requestBody": { "required": true, "content": { "application/json": { "schema": { "type": "object", "required": ["size", "pizza", "toppings", "drink", "address"], "properties": { "size": { "type": "string", "enum": ["small", "medium", "large"] }, "pizza": { "type": "string", "enum": ["veggie", "meat lovers", "margherita", "hawaiian", "capricciosa", "pepperoni", "frutti di mare", "diablo", "americana" ] }, "drink": { "type": "string", "enum": ["coca-cola", "fanta", "sprite", "orange juice", "apple juice", "carrot juice" ] }, "toppings": { "type": "string", "enum": ["onion", "extra cheese", "ketchup", "garlic sauce", "carrot chips", "thick crust"] }, "address": { "type": "string", "example": "123 Carrots Avenue" } } } } } }, "responses": { "201": { "description": "Order placed successfully" } } } } } }
In the final step, a summary of the custom extension that we have added is displayed. If everything is correct, we can approve the extension and incorporate it into our assistant.
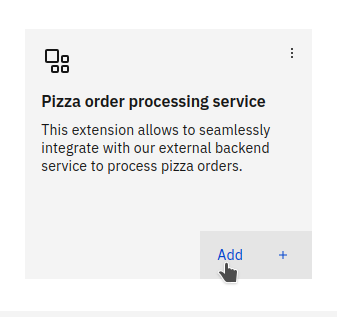
The final step in enabling the use of the custom extension we created is pressing the "Add" button and specifying the URL of the server to which we want to send requests. This will allow us to invoke the API of the backend service from within the conversation flow and perform actions such as placing an order or accessing data stored on the service.
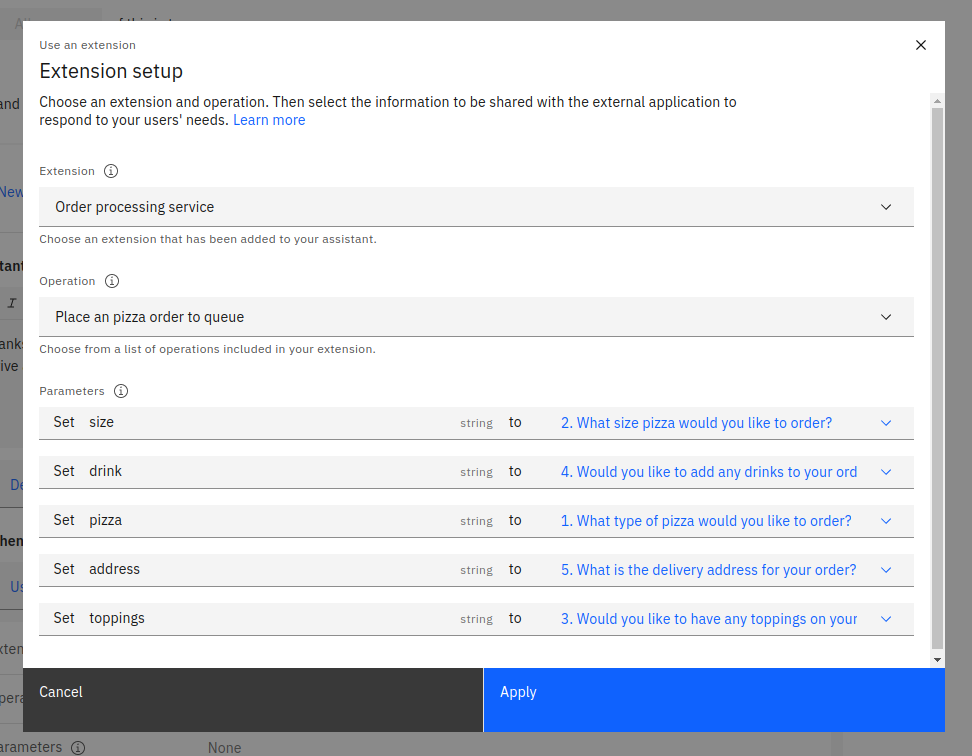
Once we have created and added the new custom extension to the assistant we are building, we can return to the action of placing an order and use it in the step that is activated after the user confirms the order.
This time, instead of selecting the "End the action" option, we will choose "Use an extension", which will allow us to select the operation from the provided specification that the assistant should execute before proceeding to the next step or finishing the action. Below, we also can specify the parameters that we will send in the request. In our case, this will be the information collected in individual steps. After completing the form, we can submit it and proceed to the final step in the development of our own virtual assistant which is testing.
Conversation preview
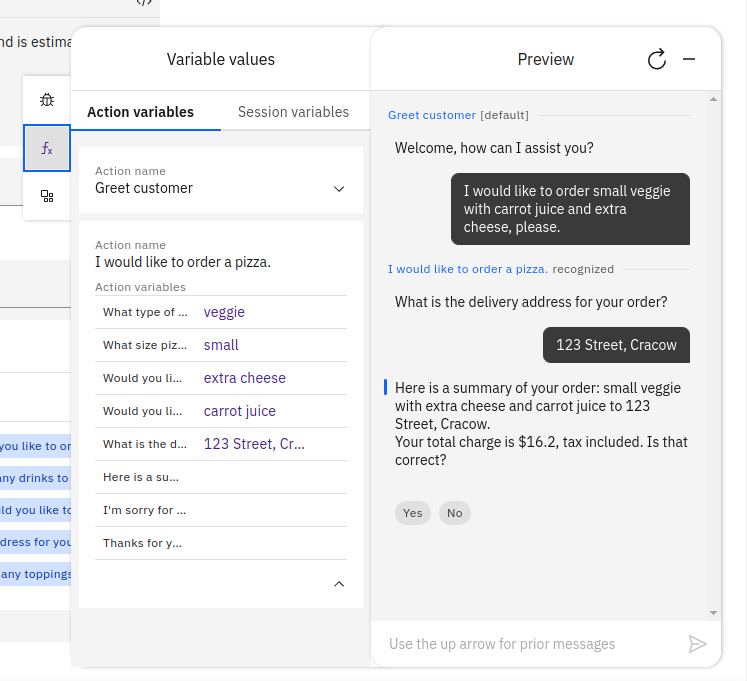
One of the extremely useful features provided by IBM Watson that we will discuss in this post is the preview function. You can initiate the preview by pressing the button in the lower right corner. It allows you to test conversations and preview the values of variables in real-time, which facilitates debugging and identifying issues before we deploy the created assistant to our application. This is an invaluable tool for ensuring the smooth operation and functionality of the assistant.
Below, you can see the capabilities we have achieved with the steps we followed in this post. The example, of course, ended in an error, which is due to the fact that on the server we specified in the extension, we did not have any application running that could handle the incoming request. While this topic is beyond the scope of what we have discussed, you can try creating communication between the assistant and your service as a home exercise after reading this post. This will allow you to gain a deeper understanding of how integrations and custom extensions work and how you can use them to extend the capabilities of your virtual assistant.
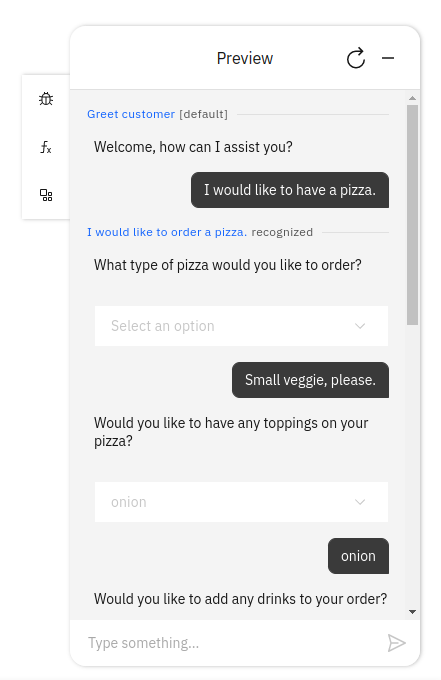
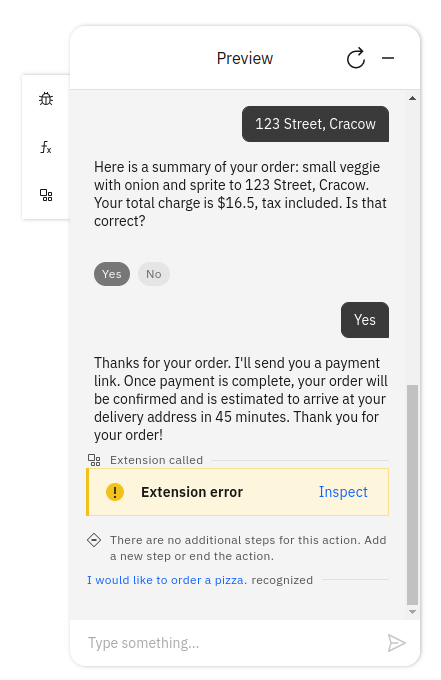
In the next screenshot, you can also see the ability of the assistant to extract all the necessary information from a single message, without requiring additional questions. On the left, there is also a set of development tools that allow you to delve deeper into the conversation and analyze it in greater detail. These tools are useful for debugging and optimizing the performance of the assistant.
Summary
In this post, we walked through an example of building a smart assistant that allows users to order pizza using IBM Watson tools. We covered topics such as creating actions, different types of variables, and user intents, as well as more advanced topics like using the expression language and building custom extensions.
Throughout the tutorial, we demonstrated how to use the various features of Watson Assistant to create a comprehensive and seamless user experience. We also showed how to test and debug the assistant using the preview function and development tools.
We hope that this post has been helpful in helping you create your own virtual assistants and has provided a smooth start to working with the capabilities offered by IBM Watson. Don't forget to check out our other articles for more tips and insights. Happy hacking!
If you have any doubts, reach us out! We will help you tackle the obstacles on your way. Trust an experienced software development company.
Tomasz Kisiel
Backend Developer
Share this post


